Monday, June 30, 2014

4th of July Recipe-Round-Up


Updated June, 2019

Summertime, cookouts, swimming, boating and more all builds with excitement toward the 4th of July and Independence Day Celebrations all over the United States.


Food, Fun, Family, Friends and Fireworks! This recipe round-up includes 45 all-time backyard barbecue favorites.


There is something for everyone here, from salads to entrees and desserts.


Fire up those grills, whip up the salads and desserts and get ready to celebrate!


SALADS

Asparagus and Tomato Pasta Salad
Broccoli and Cauliflower Salad
Creamy Cucumber Salad with Dill
Easy Macaroni Salad
Grandma Joan's Coleslaw
Potato Salad
Tuna Pasta Salad
Veggie Pasta Salad with Bacon


BEANS
Boston Baked Beans
Home-Style Barbecue Baked Beans
John's Creole Red Beans
Ranch-Style Pinto Beans


ENTREES
Beef Back Ribs
Curt's Grilled Chicken Salad
Grilled St. Louis Ribs
Grilled Center Cut Pork Chops
Grilled Rack of Lamb
Grilled Pork Shanks
Grilled Rock Cornish Game Hens
Hand-Pulled Pork Barbecue
Italian Seasoned Grilled Chicken
Low Country Boil
Man 'O Steak
Perfectly Grilled London Broil
Steamed Shrimp


DESSERTS
Banana Pudding
Blueberry Cobbler
Butterscotch Pecan Cheesecake
Chocolate Shortbread Striped Delight
Double Chocolate Ecstasy Ice-Cream
Ethan's Homemade Brownies
Fresh Strawberry Cake
Fried Lemon Pies
Frozen German Sweet Chocolate Pie
Italian Cream Cake
No-Bake Blueberry Cheesecake Parfaits
No-Bake Chocolate Pudding Cheesecake Parfaits
No-Bake Strawberry Cheesecake Parfaits
Old-Fashioned Banana Pudding
Peachy Peach Ice-Cream
Southern Candied Butter Pecan Ice-Cream
Strawberry Cream Delight
Strawberry Dream Squares
Vanilla Chocolate Chip Ice-Cream
Zucchini Cake with Cream Cheese Frosting

Enjoy,

Mary

© Cooking with Mary and Friends. Unauthorized use and/or duplication of this material without express and written permission from this blog’s author and/or owner is strictly prohibited. Excerpts and links may be used, provided that full and clear credit is given to Cooking with Mary and Friends with appropriate and specific direction to the original content.

Wednesday, June 25, 2014

Best Soft Bread


Homemade Bread!  Does anything smell better baking? Is there anything better then fresh baked bread hot out of the oven slathered in butter or jam?  Ummmm ... not!  It is all so good, so I was really happy to discover this recipe via my friend, Mary, at Bunny's Warm Oven.


I've since made it many, many times, and my only change to her recipe was to add half organic hard white wheat flour. It is still very soft and delicious every time I make it. We use it for sandwiches, toasted with butter and jam, French toast and more. And it freezes well ... what could be better than that?


RECIPE
Ingredients
2 1/2 cup hot water
1/3 cup honey
1/3 cup oil (your choice)
1 1/2 tbls. yeast
3 1/2 cups all-purpose flour
3 1/2 cups hard white wheat flour*
*Or use all-purpose flour if desired

Method
Mix water, honey, and oil together. Whisk in 3/4 cup flour and yeast. Using a stand mixer, add 2-3 cup flour and mix until blended, add remaining flour 1 cup at a time (total amount of flour is 5-7 cups not counting the 3/4 cup you added in the beginning) and mix 5-7 minutes allowing the mixer to do the kneading for you. The dough should be very soft and not too stiff.

Turn out onto a floured board and knead a few minutes more until you have a smooth dough ball. Lightly grease mixing bowl and add dough turning once to coat; cover with plastic wrap and raise dough 30-45 minutes or until doubled in size. (*Tip - turn oven on to 400 for 1 minute, turn oven off and place bowl in oven).

Punch down and turn out onto a lightly floured board. Divide dough in half and shape each into loaves; roll the dough out into a rectangle removing air bubbles then roll up tightly, pinch ends and place seam side down in lightly greased bread pans. Let rise in warm place 30 minutes (repeat oven tip above).

Remove from the oven. Preheat to 350 degrees and bake loaves 30 minutes. Bread should sound hollow when done.

Remove loaves from bread pans and let cool on a cooling rack. Brush tops of loaves with butter if desired. For best storage, only slice what you'll use each time and store the loaves well wrapped.

This bread also freezes well.

Enjoy,

Mary

© Cooking with Mary and Friends. Unauthorized use and/or duplication of this material without express and written permission from this blog’s author and/or owner is strictly prohibited. Excerpts and links may be used, provided that full and clear credit is given to Cooking with Mary and Friends with appropriate and specific direction to the original content.


Monday, June 23, 2014

Butterscotch-Pecan Cheesecake


My family and I all love cheesecake!  For many, many years while my husband was serving in the U.S. Air Force, we moved A LOT, and homemade lasagna with cheesecake for dessert was always the first meal served in our new home, wherever those orders brought us.

It's something the entire family, but especially my children, looked forward to. This special dinner told us we were "settled" again, and it gave us peace and grounding, something very much needed when you're a military family. This was our tradition and something we did for more than 23 years. Is it no wonder it's still a family favorite?


In those days the cheesecake I made was a traditional NY-Style Cheesecake recipe I got from my mother-in-law when I was first married. This cheesecake is just a bit different, and models itself after one my son makes, which is an awesome Praline Cheesecake his friends and family all really love.

I, however, was after something just a bit different. I wanted a larger cheesecake I could bake in a 13 x 9-inch pan and simply cut squares from. I didn't want a graham cracker crumb crust or a vanilla wafer crust, so I made a shortbread crust. Oh my word ... yumm!!! Topped with more pecans and drizzled with butterscotch topping, this is a keeper.


RECIPE
Ingredients
Crust
1 cup flour
1 1/2 cup finely chopped  pecan pieces, 1/2 cup reserved for topping 
1/4 cup sugar
1/2 cup (1 stick) unsalted butter, melted
Cheesecake
4 - 8 oz. packages cream cheese, softened
1 1/2 cups sugar
1 cup sour cream
3 tbsp. flour
1 tbsp. pure vanilla extract
4 large farm fresh eggs
Butterscotch Sauce
4 tbsp. (1/2 stick) unsalted butter
1/2 cup packed dark brown sugar
1 tsp. salt (regular or large-flake sea salt)
1/2 cup heavy cream
1 tsp. pure vanilla extract

Method
Preheat oven to 325. Lightly spray or grease a 13 x 9-inch baking dish; mix all crust ingredients together and press into the bottom of baking dish. Set aside.  

In a large mixing bowl, beat the cream cheese with the sugar until fluffy. Stir in sour cream, flour and vanilla, beating until smooth. Add eggs one at a time, beating well after each addition until just blended. Pour over crust. Bake 45 minutes or until center is almost set. Remove from oven and cool. Refrigerate 4 hours.

While cheesecake is cooling, make the butterscotch sauce:  Melt the butter in a medium heavy-bottomed saucepan (not non-stick) over medium heat. Add the brown sugar, salt and heavy cream and stir the mixture with a rubber spatula until it's well blended. Bring the mixture to a boil, scraping down the sides occasionally, and boil it for 4 to 5 minutes. 

Remove the mixture from the heat and stir in the vanilla extract. Transfer the butterscotch sauce to a container to cool. Do not over-boil it as it thickens a lot while cooling and you want sauce, not caramels. 

Assemble
After the cheesecake has cooled, sprinkle top with 1/2 cup chopped pecan pieces and drizzle with 1/4 cup of the butterscotch sauce. Cut into squares and serve. Reserve remaining butterscotch sauce to serve with the cut cheesecake if desired.

Enjoy,

Mary

© Cooking with Mary and Friends. Unauthorized use and/or duplication of this material without express and written permission from this blog’s author and/or owner is strictly prohibited. Excerpts and links may be used, provided that full and clear credit is given to Cooking with Mary and Friends with appropriate and specific direction to the original content.


Saturday, June 21, 2014

Turkey Creek Bee Farm Outing

Bee Hives busy with bees
Nestled away on just over and acre and a half, sits this small urban farmstead known as Turkey Creek Bee Farm.  Located at 1246 Manning Drive in Sumter, S.C. it's less than 15 minutes from downtown Sumter, but transports you to a whole different world once you arrive.
Here Leroy raises bees for honey, chickens for eggs, chickens for meat and a variety of organic produce he and his family sell seasonally Wednesdays-Saturdays on the farm. 5th grade science and math teacher by day, and bee keeper and farmer by night and weekends, this little urban farmstead has a lot going for it.
What started in April with me reaching out to Leroy and arranging a group tour, culminated with our visit today, which was the first day of summer, and naturally one of the hottest days of the year so far. We arrived just ahead of our 10 a.m. appointment, but Leroy was ready for us, and all of us were anxious to hear about this little gem of a place.
Fresh honey
 "We started with bees three years ago because I had bad allergies to local pollen and flowers and a friend informed me of eating local honey to reduce allergies. I decided to start a facebook page and polled my friends and family about their desire to purchase honey. Their response was amazing. Last spring we harvested 47 lbs. total from our hives and sold it all in less than 3 hours," Leroy explained. 
"After reading several reports and watching several documentaries on the chemicals used in the processing of meat and veggies by the food industry, I decided I had to do something to help my family eat food that
Leroy Steigerwalt, owner

was natural and healthy. It just so happened that a fellow colleague was hatching chickens in her classroom and needed someone to take the birds. I gladly accepted and decided to raise and butcher the birds for my family. After posting on our page about the chickens being raised on all organic methods my friends and family started asking to purchase chickens from us. 


Chickens being raised for meat
Thus began the poultry division of our little farm. We raise our birds on all organic feed that contains no animal proteins. We also do not medicate or treat our birds with any chemicals or steroids. We pride ourselves on our chickens being raised in the healthiest means possible. My favorite saying for our chickens is, "If your chicken tastes like everything else, there is something
Laying Hens eating grasses
wrong with your chicken." Every month we raised chickens we never seemed to have enough. This demand for high quality 100% Organic Chicken led us to build a large chicken house with automated temperature controls and watering system in order to accommodate our customers. We ended the season butchering 60 birds per butcher and this year we are already at 60 birds and look to end the season with 100 per butcher. Our birds average 5+lbs. and are honestly the best chicken you will ever put in your mouth. 

Organic Yellow Squash
One of our farmer friends suggested we start selling produce to go with the chickens. This was the one thing missing from my family eating healthy and reducing the poisons we were ingesting. After polling friends, family, and customers we had no choice but to begin selling produce but insisted that it be fresh and if
Organic Green Beans
we could not shake the hand of the man that grew it, we simply would not sell it. Last season we only sold South Carolina produce that was grown by ourselves or people that we created relationships with. All of the produce we carried was picked the same day we purchased it. After three days we would eat it ourselves, give it to the neighbors, or donate it to the local fire dept. My thinking was and is,
Organic Blueberries
if you are buying produce that is three days old or more, you may as well be buying from the grocery store. 

This year we have expanded our growing operation in hopes to only sell things that we grow ourselves. 
Our mission....to offer the finest 100% Organic, medicine free, hormone free, animal protein free chicken available; as well as the freshest handpicked vegetables and fruit that can be grown. 
If people buying from the grocery stores think the food is healthy and fresh they need to stop on by and check us out. Our products sell themselves and speak volumes for the public needs and desire for truly fresh food. Food that tastes the way nature intended it ... tomatoes are not all supposed to be the same shape and color, and chickens are not supposed to taste like everything else."

Because he sells out of his products so quickly, my best advice to you is get out there early Wednesday or Thursday so you have the best selection. I know that's what I'm going to do, because if you wait until later on Friday or Saturday they may already be sold out ... yes, it sells that fast because it's that good and the prices are very reasonable. In fact, they're some of the best prices I've seen.

Follow Turkey Creek Bee Farm on Facebook
Contact Turkey Creek Bee Farm 803-795-9289

Today's recipe! Asian Chicken Noodle Bowl featuring organic green beans from Turkey Creek Bee Farm


Ingredients
1/2 cup slivered almonds
2 tbls. butter
1 small handful thin spaghetti noodles
4 chicken breast tenders, sliced  into thin strips
1-2 cups fresh organic green beans, ends trimmed
1/4 cup sliced green onion
1-2 tsp. black pepper
2 tbls. Teriyaki sauce
1-2 tbls. corn starch
2 cups chicken stock
1 cup water, or more as needed


Method
Rinse and blanch fresh green beans in a small sauce pan in boiling water 1-2 minutes; drain and set aside.  In a large covered fry pan, melt butter and add almonds and spaghetti noodles, stirring to brown slightly. Add chicken, green beans and sliced green onion.  Sprinkle with corn starch and black pepper; add chicken stock and Teriyaki sauce, stirring until everything is well blended (add 1 cup water if needed to keep from becoming too thick). Cover and simmer 5-10 minutes, stirring occasionally until chicken is cooked through, spaghetti noodles are cooked and green beans are crisp tender. Serve immediately in large bowls.

Yield:  2-4 servings


Click here for print friendly version
Pin it here


Enjoy,
Mary


Friday, June 20, 2014

Asian Chicken Noodle Bowl


I enjoy many Asian foods for several reason; they're tasty, healthy, quick and easy.  All you have to do is prep some ingredients prior to cooking, and you have a healthy, delicious meal in 30 minutes or less.  What's not to like?  Quick, healthy, easy?  That's just how I like things and this is perfect for a quick, weeknight dinner.

Ingredients
1/2 cup slivered almonds
2 tbls. butter
1 small handful thin spaghetti noodles
2 chicken breasts, cut off bone and sliced into thin strips (or cubed, cooked chicken)
1-2 cups fresh organic green beans, ends trimmed
1/4 cup sliced green onion
1-2 tsp. black pepper
2 tbls. Teriyaki sauce
1-2 tbls. corn starch
2 cups chicken stock
1 cup water, or more as needed

Method
Rinse and blanch fresh green beans in a small sauce pan in boiling water 1-2 minutes; drain and set aside.

In a large covered fry pan, melt butter and add almonds and spaghetti noodles, stirring to brown slightly.

Add chicken, green beans and sliced green onion.  Sprinkle with corn starch and black pepper; add chicken stock and Teriyaki sauce, stirring until everything is well blended (add 1 cup water if needed to keep from becoming too thick).

Cover and simmer 5-10 minutes, stirring occasionally until chicken is cooked through , spaghetti noodles are cooked and green beans are crisp tender. Serve immediately in large bowls.

Yield:  2-4 servings

Enjoy,
Mary


Wednesday, June 18, 2014

Herb Crusted Pork Tenderloin

First of all I have to say pasture raised pork, free from unnecessary antibiotics and added hormones is awesome!  This is not the pork you buy in the grocery store. This pork is tender, moist and juicy ... every single time, not dried out, flavorless and tough. In fact, I have yet to buy any pastured pork product that was anything short of delicious.
I recently had the privilege of touring Thames Farm, meeting Amy Thames and her sidekick, Melvin the Turkey ... and what a "ham" he is! This is what Amy had to tell us, "Thames Farm is dedicated to raising healthy all-natural pastured Berkshire pork, pastured chicken and lamb. All our animals are raised on a natural diet and are never given antibiotics, steroids or any growth hormones. Our pastures are maintained chemical free. Our pigs are allowed to be pigs. They are happy and have social interaction with each other. We finish our pigs for processing on the pasture. Our pigs are supplemented with grains, vegetables, and raw Jersey cow milk. They graze and bask in the sunshine." Read all about our farm visit here.
I guess it's no wonder then their pork products are so darn good. Not to leave out their chicken, because that was very good too, but this post is all about the pork (see Italian Seasoned Grilled Chicken here).


Ingredients
1 Pork Tenderloin (pastured pork)
Herbs and seasonings of your choice (we used a mixture of chive, parsley, basil, garlic, onion flakes, and black pepper)

Method
Coat pork tenderloin thoroughly with herbs and seasonings; pat with fingers to adhere to tenderloin. Grill on medium-high heat 10 minutes per side or until cooked to an internal temperature of 145 (See safe cooking temperatures here).   Remove from heat and let stand 5-10 minutes before slicing. Serve with your choice of side dishes.

Yield:  4 servings

Enjoy,
Mary


Gourmet Longaniza

So, first of all, what the heck is Longaniza?  Well according to Wikipedia "Longaniza is a Spanish sausage similar to a chorizo and also closely associated with the Portuguese linguiça. Its defining characteristics are interpreted differently from region to region." But these didn't really taste like that at all. 

Essentially, they're a slightly spicy pork sausage, and at Thames Farm it is likened to a hot dog but made with pastured pork instead of beef.  And since longaniza means "long and thin" that is why they are referred to as gourmet hot dogs. Keep in mind though, unlike traditional hot dogs, these are uncured, and completely raw. They do need to be fully cooked before serving. I prefer mine with with diced white onion, yellow mustard, and pickle and/or relish. They're just as delicious plain and simple with ketchup and mustard. Or you could do spicy mustard and sauerkraut, or a chili-cheese dog.

purchased some during our recent farm visit, and just grilled them today! Oh my goodness ... they are amazing, with just a little bit of spicy bite to them. I will definitely be buying more.


Ingredients
1 pkg. Gourmet Longaniza
1 pkg. Hot dog buns
1 small onion, diced
Mustard, ketchup, pickle relish, sauerkraut, chili, cheese

Method
Grill Longaniza approx. 8-10 minutes over medium heat, turning several times during grilling to insure even browning and cooked completely. Remove from grill and serve as desired on hot dog buns with your choice of toppings.


Enjoy,
Mary


Tuesday, June 17, 2014

Corn and Kidney Bean Salad

I've never been much for cold bean salads.  Yes, I know so many people really like them, but they've just never been "my thing." In fact I can't tell you how many times I've passed them by, giving them no more than a passing glance ... but all that changed when I made this Corn and Kidney Bean Salad using some Fresh Corn Salsa as the base and a bag of dried kidney beans.  I had no idea how this was going to taste, but I was going to give it a try. Wow!  That's all I can say is wow ... spicy, yet sweet, tangy yet subtle.  Delicious! And even better yet, dried beans are good for you.  Making beans of almost any kind from dried beans is so frugal and economical.  Beans are loaded with nutrients that our bodies crave:
  1. B Vitamins: are necessary for healthy brain and nerve cells, for normal functioning of the skin, nerves and digestive system.
  2. Calcium:  for strong bones and teeth and to help keep the body more alkaline, rather than acidic.
  3. Potassium: helps reduce the risk of high blood pressure and stroke.
  4. Folate: a B vitamin that our bodies don't produce yet dry beans are our single best source of this important vitamin which helps protect against heart disease and cancer.


Ingredients
1 - 16 oz. bag dried Kidney Beans
1 - 16 oz. jar Fresh Corn Salsa
Sliced Pickled Jalapeno Peppers (to taste)
Salt and pepper to taste

Method
In a large stock pot, using the "quick soak" method, boil kidney beans in 8 cups water for 2 minutes. Remove from heat, cover and let stand 1 hour.  Drain and rinse beans well.  Place beans and 6 cups fresh water in a large stock pot and bring to a boil; reduce heat and simmer 1 hour or until beans are soft.  Rinse beans in cold water and drain.  In a large mixing bowl, combine Fresh Corn Salsa (with liquid) and cooked kidney beans. Toss in some pickled jalapeno pepper slices and stir well.  Season with salt and pepper to taste. Place mixture into a covered bowl and refrigerate several hours before serving.

Yield:  6-8 servings

Enjoy,
Mary


Monday, June 16, 2014

Easy Pan Fries


Want some delicious French Fries in a hurry?  Pan fry them!  So simple, quick and easy I make them for lunch once in awhile.


Ingredients
Russet potatoes, cut into fries
2-4 Tbls. cooking oil (your choice, I use peanut oil)
Salt and pepper to taste
Other seasonings as desired

Method
Heat oil in non-stick fry pan until oil is very hot. Meanwhile, wash potatoes, and cut into fries. Rinse with cold water and blot dry on paper towels.

Season with salt and pepper and add to hot oil in fry pan. Cook, stirring from time to time, until potatoes are cooked and fries are crispy, approx. 8 minutes.

Drain fries on paper towel and season to taste with more salt and pepper. Serve immediately.

Enjoy,
Mary


Friday, June 13, 2014

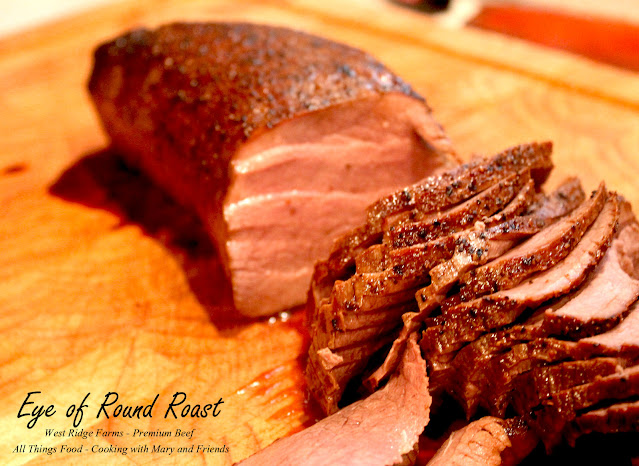
Eye of Round Roast


By far one of the BEST Eye of Round Roast I've ever had and it started with grass-fed beef from West Ridge Farms - Premium Beef where I had the pleasure of meeting owner, Adam Frick, and touring his awesome farm earlier this year.  What they had to say about their beef was important to me "We guarantee that our beef is free of all steroids, added hormones, and antibiotics. Our cattle are raised entirely on pasture and are not confined or sent to feedlots." Read more about this awesome farm here


When considering roasting this Eye of Round Roast, I had read many interesting recipes online, and had a few ideas of my own.  I didn't want this roast to be a "pot roast," but rather a true, roasted beef we could enjoy for dinner and then use for French Dip Sandwiches another day. 

Eye of Round Roast is not known to be the most tender cut of beef. The eye of round is a cut from the round steak section of a beef hind quarter. A round steak actually has 3 different "cuts" in it that you can buy at the grocery store. The bottom round (which can be labeled a London Broil roast), the top round (usually a steak), and the Eye of Round (sold either as a roast or a steak). Of the 3 parts of a round steak,  Eye of Round is the most tender (BUT, it is NOT as tender as a rib eye).

So, after researching things a bit more, I found a way to roast this beef, and make it come out juicy and tender.  How?  High Heat Roasting and it turned out perfectly!


Ingredients
1 - 3.5 lb. Eye of Round Roast
1 tsp. sea salt
1 tsp. course-ground black pepper
1 tsp. garlic powder

Method
Preheat oven to 500 degrees. Remove roast from refrigerator and rub liberally all over with salt, pepper and garlic. Let rest 30 minutes. Place roast in a large roasting pan, fat side up, and roast in oven 7 minutes per pound, or approx. 25 minutes. Turn the oven off completely, yes, TURN OFF OVEN, and leave the roast in the oven for 2 1/2 hours. After 2 1/2 hours, take the roast out and check its internal temp with an instant read thermometer. The temperature should be about 130 degrees. Put the finished roast on a plate and cover it with tin foil, and allow it to rest for 10 minutes. Serve immediately.

As a quick reference, here are the standard temperature levels for roasts:
120-125 = Rare
130-140 = Medium Rare
145-150 = Medium
If you have any concerns your oven won't hold the heat, reduce the oven heat to 170 (after roasting at 500 for the 25 minutes) and check roast after one hour, then every thirty minutes afterward for desired doneness.
Enjoy,
Mary
© Cooking with Mary and Friends. Unauthorized use and/or duplication of this material without express and written permission from this blog’s author and/or owner is strictly prohibited. Excerpts and links may be used, provided that full and clear credit is given to Cooking with Mary and Friends with appropriate and specific direction to the original content.

Thursday, June 12, 2014

Old-Fashioned Blueberry Coffee Cake


This recipe takes me back to my "northern" roots growing up in New England.  Back then it seemed we always had blueberry muffins, coffee cakes, pies and cobblers around when it was blueberry time in the summer. And blueberry pancakes were always a welcomed treat on a Sunday morning. Luscious, beautiful, gorgeous blueberries, bursting with flavor, fresh from the local farmers market.

Full of nooks and crannies of sugar topping and blueberries

This recipe originated in an old Betty Crocker cookbook of my mother's from the early 1950's, and I started making it from an updated version of the same cookbook back when I got married in the early '70's.


This is one of those "tried and true" recipes you just don't mess with, because it works ... every single time. Fresh blueberries, real butter, sugar and eggs deliciousness with a sweet, crunchy topping.


RECIPE
Ingredients
Cake:
2 cups all-purpose flour
3/4 cup sugar
2 1/2 tsp. baking powder
3/4 tsp. salt
1/4 cup shortening (or lard)
3/4 cup milk
1 egg
2 cups fresh blueberries

Topping:
1/2 cup sugar
1/3 cup flour
1/2 tsp. cinnamon (optional)
1/4 butter, softened

Method
Preheat oven to 375 degrees.  Spray or grease a 9 x 9-inch baking dish.

In a large mixing bowl, combine all batter ingredients together, except blueberries, and mix until well beaten. Batter will be thick. Gently fold in blueberries and spoon batter into prepared baking dish.

In a small bowl, mix together topping ingredients and sprinkle over batter.

Bake 45-50 minutes or until a wooden pick inserted in center comes out clean.

Yield:  9 servings

Also seen on Meal Plan Monday

Enjoy,

Mary

© Cooking with Mary and Friends. Unauthorized use and/or duplication of this material without express and written permission from this blog’s author and/or owner is strictly prohibited. Excerpts and links may be used, provided that full and clear credit is given to Cooking with Mary and Friends with appropriate and specific direction to the original content.


Wednesday, June 11, 2014

Grilled Center Cut Pork Chops


Fire up your grill and get ready to have the best pork chops you've ever eaten.  I bought some pasture raised, antibiotic and hormone free 1-inch thick center cut pork chops from our friends at Sunny Cedars Farm and rubbed them with Willie's Hog Dust original blend. Amazingly juicy, moist and flavorful. You seriously won't think you're eating pork, it's that darn good. 

"Pork is now marketed as “the other white meat,” because that’s what you get in the grocery store – a nondescript, flavorless white meat that has to be brined or marinated to give it any flavor. At Sunny Cedars, we know how pork is supposed to be — dark rosy pink, perfectly marbled, rich and juicy, and bursting with flavor!" 

We are now "pork snobs" as I call ourselves, because we simply can't buy pork any other way than from our local farms.  It ... is ... seriously ... that ... good!


Recipe
Ingredients
1-inch thick center-cut pork chops (preferably from your local, small family farm)
Willie's Hog Dust Original Blend

Method
Liberally sprinkle Willie's Hog Dust over both sides of the pork chops and rub in with your fingers. Let sit 30 minutes at room temperature.

Preheat the grill to 350 and using direct-medium heat grill 5-7 minutes per side or until internal temperature is 145 for medium-rare. Remove from grill and let rest 5 minutes before serving (the total cooking time is dependent on thickness of chops).

Safe minimum cooking temperatures


Disclaimer - I do not have a financial arrangement with Willie's Hog Dust.  
All opinions expressed here are my own.

Enjoy,
Mary

© Cooking with Mary and Friends. Unauthorized use and/or duplication of this material without express and written permission from this blog’s author and/or owner is strictly prohibited. Excerpts and links may be used, provided that full and clear credit is given to Cooking with Mary and Friends with appropriate and specific direction to the original content.