Wednesday, August 22, 2012

Cheesy Potato Soup


Ohhhh I just love this soup!  Add ham if you want, and we have from time to time! It is oh so good, and just plain ole' comfort food!  So good you just have to have a bowl full!  Serve it in an Italian Bread Bowl for a fun meal!


Recipe

Ingredients
1 bag (32 oz) frozen southern-style diced hash brown potatoes, thawed
2 cups niblet corn (optional)
½ cup chopped onion
1 medium stalk celery, diced (1/2 cup)
32 oz. chicken broth (make your own)
1 cup water
3 tablespoons all-purpose flour
1 cup milk
1 bag (8 oz) shredded sharp cheddar cheese (2 cups)
1/2 cup cooked and crumbled bacon (or diced ham pieces)
4 medium green onions, sliced (1/4 cup)
Garlic salt and course-ground black pepper, to taste

Method
In 3- to 4-quart slow cooker, mix potatoes, onion, celery, broth and water.
Cover; cook on Low heat setting 6 to 8 hours.

In small bowl, mix flour into milk; stir into potato mixture. Increase heat setting to High. Cover; cook 20 to 30 minutes or until mixture thickens. Stir in cheese until melted. Garnish individual servings with bacon and green onions. Sprinkle with pepper if desired.

*Note - Southern-style hash brown potatoes are diced instead of shredded. These work best in this recipe.  I served this with more cheese on top and a hot, crusty bread, or in Italian Bread Bowls.


Enjoy,
Mary

© Cooking with Mary and Friends. Unauthorized use and/or duplication of this material without express and written permission from this blog’s author and/or owner is strictly prohibited. Excerpts and links may be used, provided that full and clear credit is given to Cooking with Mary and Friends with appropriate and specific direction to the original content.

Sunday, August 19, 2012

Southern Fig Jam


Updated August 2020

Sweet little figs are readily available here in the South, with many southeners having fig trees in their yards. Usually they are more than happy to share some of the bounty, so when my friends tell me the figs are ready I always get a gallon or two and tuck them away in the freezer. 

bag of figs
Got them out today and made more delicious fig jam! It's so tasty with just a touch of cinnamon. One of the best compliments I ever received was when a good friend said it was so yummy it would even be good over vanilla ice-cream! Now that's a compliment!

Cutting them when partially frozen is easier

Fig jam cooking
RECIPE
Ingredients
6 cups chopped figs
1 package Sure-Jell (fruit pectin)
1/2 cup water
1/4 cup lemon juice
1 tsp. butter (to prevent foaming)
1 tsp. ground cinnamon
8 cups granulated sugar

Method
Mix the figs, Sure-Jell, water, lemon juice, butter and cinnamon in a large stock pot; mash figs slightly, puree with an imersion blender, or leave chunky. Bring to a boil over high heat, stirring often to prevent sticking.

Add sugar all at once. Stir mixture constantly until it returns to a rolling boil.  Continue stirring and boil hard for one (1) minute.

Remove from heat and ladle mixture into 1/2 pint or 1 pint canning jars, leaving a 1/4-inch head-space. Place jars in a water bath (this can be a large stock pot with a rack on the bottom) and cover completely with water to 2" over the top of the jars, or use a steam canner. Process jars 10 minutes.

Remove jars from boiling water bath or steam canner and allow to sit undisturbed on a kitchen towel on your counter-top 24 hours.

Jars are sealed when button in middle of lid pops down. Store jars on your pantry shelf up to 1 year.


Yield: 5 pint jars or 10 half-pint jars

Try Drunken Fig Jam for a boozy twist!

Enjoy,
Mary

© Cooking with Mary and Friends Unauthorized use and/or duplication of this material without express and written permission from this blog’s author and/or owner is strictly prohibited. Excerpts and links may be used, provided that full and clear credit is given to Cooking with Mary and Friends with appropriate and specific direction to the original content.

Thursday, August 16, 2012

Homemade Applesauce


I love it when the weather turns just a bit cooler outside, and you know Fall is coming!  That's the best time to buy local apples and make some homemade applesauce.  It's very simple to do and the taste is fantastic.  I can't keep it around our house ... the grandsons eat it up as fast as I make it!

Quarter apples and cook until soft with small amount of water to prevent sticking

All cooked and ready to process in a food mill or fruit and vegetable strainer attachment
Process through a food mill
Or process using Fruit Strainer attachment for Kitchen Aid
Recipe

Ingredients
10 lbs. or more crisp, crunchy apples (I use Honeycrisp)
water
sugar to taste (optional - no sugar is necessary if you don't want to add it)

Method
Stem apples and quarter. Put core and all into large stockpot, add a little bit of water to prevent sticking, about 1/2 cup or less. Cover pot and bring to boil over med-high heat, stirring occasionally to prevent sticking. Apples will get very soft and mushy. 

Once cooked, process apples though a food mill, fruit strainer attachment on Kitchen Aid Mixer or sieve to remove skins, and seeds over a large bowl. 

Taste applesauce and add sugar as desired, starting with 1/2 cup. At this point you could also add cinnamon if desired (adding sugar is completely optional - I never add any).

Pour applesauce into canning jars leaving 1/2 inch head-space. Remove air bubbles and process pints 15 minutes in boiling water bath (quarts 20 minutes). Remove jars and let cool on a kitchen towel on your counter top 24 hours undisturbed. Jars are sealed if button on lid is fully depressed and will not move.

Add sugar if desired. I normally do not add any sugar.
Applesauce all done
Cooks Note - Recipe is easily doubled or tripled. Store sealed jars in pantry up to one year. Open jars need to be refrigerated.

Enjoy,
Mary

© Cooking with Mary and Friends. Unauthorized use and/or duplication of this material without express and written permission from this blog’s author and/or owner is strictly prohibited. Excerpts and links may be used, provided that full and clear credit is given to Cooking with Mary and Friends with appropriate and specific direction to the original 
content.

Saturday, August 11, 2012

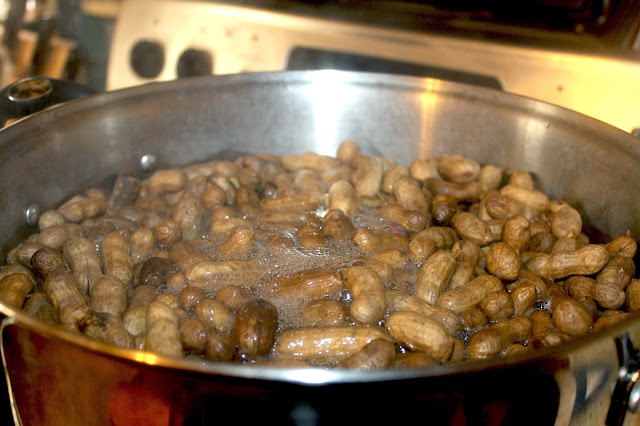
Boiled Peanuts for freezing or canning


Updated and Revised August 2019

I love boiled peanuts, even though I grew up in New England, and a boiled peanut had never touched my lips until I was an adult. In fact the first boiled peanuts I ever had my good friend, Liz, made. She had frozen hers, which is equally as good as canning them.


I became intrigued with canning them a few years ago, and have since made many jars for friends and family. My grandsons love them as a snack and can't seem to get enough of them. This process of cooking and canning or freezing the boiled peanuts is one of the best I've found.


Of course you can add spices to the boiled peanuts, so I added some Old Bay Seasoning to a couple of jars and they were a huge hit!


  • YES you absolutely can cook them in a slow cooker. Place peanuts, salt and water in a 6 qt slow cooker. Cover and cook on high 12 hours or until peanuts are tender.
  • For spiced boiled peanuts, add any you like such as Cajun, Creole, or Old Bay 
RECIPE
Ingredients
4 to 5 pounds green (raw) peanuts in shell*
4 to 6 quarts water (1 to 1 1/2 gallons)
1 cup plain salt per gallon of water

* Only use peanuts that are green (uncured). Not the color green, but fresh raw peanuts which are called green peanuts. The peanuts must not be roasted or already cooked or dried.

Method
Wash un-shelled peanuts thoroughly in cold water until water runs clear (removing loose soil and sprouts, stems, weeds, and leaves); then soak in cool, clean water for approximately 30 minutes before cooking.

In a large heavy pot, place soaked peanuts and cover completely with water. Stir to "settle" the peanuts. Add enough water to cover the peanuts by 2 inches or more.

Add 1 cup of salt per gallon of water used. Other spices or seasonings (such as shrimp or crab boil, Cajun seasoning, chili powder, and other strong spices) may be added at this point, if desired.

Bring water to a boil and then reduce the heat and let the peanuts simmer, covered, for approximately 4 hours (may take longer), stirring occasionally, and then taste. Add additional water as needed to keep the peanuts covered.

Taste again in 10 minutes, both for salt and texture. Keep cooking and tasting until the peanuts reach desired texture (when fully cooked, the texture of the peanut should be similar to that of a cooked dry pea or bean). To check whether they are done, pull 1 or 2 peanuts out of the pot and crack them open. When they are soft, they are done. If they are still slightly crunchy, they are not done yet, If they are not salty enough, leave them in the salted water and turn off the heat.

NOTE: The cooking time of boiled peanuts varies according to the maturity of the peanuts used and the variety of peanuts. The cooking time for a "freshly pulled" or green peanut is shorter than for a peanut that has been stored for a time.

Remove from heat and drain peanuts after cooking or they will absorb salt and become over salted. Peanuts may be eaten hot or at room temperature, or chilled in the refrigerator and eaten cold, shelling as you eat them. The peanuts may be stored in a covered container in the refrigerator for up to one (1) week.

  • Freezing boiled peanuts: Prepare peanuts as indicated above. Drain, allow to cool, and freeze in airtight containers. They keep indefinitely. 
  • Canning Boiled Peanuts: Cook peanuts in salted water as stated above until they are soft and salty to your preference.  Drain peanuts from cooking brine and rinse several times with fresh water (I use my sink). Pack peanuts into sterilized jars to within one-half inch of the top.  
Add fresh hot water leaving 1/2-inch head-space. Add 2 tsps. salt per quart jar. Seal while hot and process in a Pressure Canner 45 minutes at 10 pounds pressure.  
Remove canner from heat, allow it to come down from the pressure until lid unlocks, partially remove lid and let jars cool slowly in the canner for 20 minutes (this will prevent the liquid from siphoning out). 
Remove lid completely, then remove jars and let cool undisturbed 24 hours on your kitchen counter-top. Store in cool, dry place such as a dark pantry. Shelf life is one year.

Enjoy,
Mary

© Cooking with Mary and Friends. Unauthorized use and/or duplication of this material without express and written permission from this blog’s author and/or owner is strictly prohibited. Excerpts and links may be used, provided that full and clear credit is given to Cooking with Mary and Friends with appropriate and specific direction to the original content.

Sweet Pickle Relish


Updated July 2020

I just love Sweet Pickle Relish! Great for adding to potato salad, on top of hot dogs and hamburgers, or added to mayonnaise for a nice tartar sauce to serve with your favorite breaded fish! This recipe follows my basic recipe for Bread and Butter Pickles


RECIPE
Ingredients
6 cups finely diced cucumbers (small pickling cucumbers are best)
2 cups finely diced onion
1/2 red or orange bell pepper finely diced (optional)
1 1/2 cups sugar
1 1/2 cups vinegar (white vinegar 5% acidity)
1/2 tsp salt (I use pickling salt, but any salt will work)
1/2 tsp mustard seed
1/2 tsp celery seed
1/2 tsp ground turmeric

*Note - I use my food processor to chop the veggies using the "pulse" button.

Method
Mix diced cucumbers and onions in a non-reactive bowl (stainless steel or glass is best). Combine remaining ingredients in a sauce pan and bring to a boil stirring until the sugar is just dissolved.

Remove from heat and let cool to room temp; pour over cucumber/onion mixture. Cover bowl with saran wrap and let sit at least one hour ... 2 is better.

Using a slotted spoon, put relish mixture into canning jars. Push down some with your hand and ladle remaining sauce evenly into each jar leaving 1/2-inch head-space.

Seal with lids and bands and process in boiling water bath 10 minutes. Remove jars and cool on towel placed on counter top for 24 hours.

Store in kitchen pantry up to one year. Open jars must be refrigerated.

Yield: Approx 3 pints or 6 half-pint jars


Enjoy,
Mary

© Cooking with Mary and Friends. Unauthorized use and/or duplication of this material without express and written permission from this blog’s author and/or owner is strictly prohibited. Excerpts and links may be used, provided that full and clear credit is given to Cooking with Mary and Friends with appropriate and specific direction to the original content.

Wednesday, August 8, 2012

Rock Cornish Game Hens

This is one of my dad's all-time best recipes, and our family has enjoyed it many times over the years. It's adaptable to any poultry you like and I have made it many times with chicken, but it would also be good with duck or quail.

RECIPE
Ingredients
1/4 cup butter
Cooking spray
2 Rock Cornish Game Hens
2 cups beef stock
1/2 cup white cooking wine
2 bay leaves
Sea Salt (to taste)
Course-ground black pepper (to taste)
1/2 cup flour (approx)
1-2 tsp. thyme leaves

Method
Spray the electric fry pan with cooking spray (or a large fry pan with a lid). Over medium heat, add butter and melt.

Add split game hens and brown on both sides. Sprinkle on both sides with salt and pepper and dust with flour.

Add beef stock and wine, stirring until well blended. Add bay leaves and thyme, cover, and simmer on low heat 45 minutes or until game hens are cooked through.

Serve over rice or noodles with your choice of vegetable.


Enjoy,
Mary

© Cooking with Mary and Friends. Unauthorized use and/or duplication of this material without express and written permission from this blog’s author and/or owner is strictly prohibited. Excerpts and links may be used, provided that full and clear credit is given to Cooking with Mary and Friends with appropriate and specific direction to the original content.


Sunday, August 5, 2012

Italian-Style Beef and Pepperoni Vegetable Soup

Looking for a way to have a veggie beef soup with a twist, I began experimenting with a standard veggie beef soup using lean ground beef and added sliced pepperoni and some Italian seasonings!  The results are this recipe and there are never any leftovers. A friend even nick-named it "spaghetti soup!"  LOL!  Served this with some Italian Feather Bread and you have a meal.  It cooks in a crock pot on low for 8-10 hours, making it the perfect weeknight meal. Original recipe adapted from Southern Living.

Recipe

Ingredients

1 pound extra-lean ground beef
1 cup sliced pepperoni (3 ounces)
1 cup sliced fresh mushrooms
1 green bell pepper, seeded and chopped
1 bunch green onions, chopped
1/2 cup celery, diced
3/4 cup carrots, diced
3/4 cup French-style green beans
3/4 cup corn
1 cup potatoes, peeled and diced
2 garlic cloves, minced
1 teaspoon olive oil
2 tablespoons tomato paste
1 (28-ounce) can crushed tomatoes
4 cups chicken broth
1 teaspoon dried basil
1  teaspoon dried oregano
1 teaspoon freshly ground pepper
Garnishes: sliced fresh basil, shredded Parmesan cheese

Method


Cook ground beef and pepperoni in a large saucepan over medium-high heat 8 minutes or until beef crumbles and is no longer pink. Rinse and drain beef mixture.

Sauté mushrooms and next 3 ingredients in hot oil.

In a large crock pot, stir in beef mixture, carrots, green beans, corn, potatoes, garlic, tomato paste, and next 5 ingredients.

Cover and cook on low 8-10 hours.  

Servings: 8

Enjoy,
Mary

© Cooking with Mary and Friends Unauthorized use and/or duplication of this material without express and written permission from this blog’s author and/or owner is strictly prohibited. Excerpts and links may be used, provided that full and clear credit is given to Cooking with Mary and Friends with appropriate and specific direction to the original content.